

Multipass is a great tool from Canonical, that lets you create any number of Ubuntu virtual machines to play with. It works on Windows, Mac and Linux with their native hypervisors. Launching a new VM is as easy as:
multipass launchCheckout these VMs on my work laptop.
bahadir@N45ZA23:~$ multipass list
Name                    State                 Image
kubenode1               Stopped               Ubuntu 18.04 LTS
kubenode2               Stopped               Ubuntu 18.04 LTS
kubenode3               Stopped               Ubuntu 18.04 LTS
nomadcli1               Stopped               Not Available
nomadcli2               Stopped               Not Available
nomadcli3               Stopped               Not Available
nomadsrv1               Stopped               Not Available
patroni1                Stopped               Ubuntu 18.04 LTS
patroni2                Stopped               Ubuntu 18.04 LTS
patroni3                Stopped               Ubuntu 18.04 LTS
I'm currently testing other tools as well, so I needed a local Kubernetes cluster, a Nomad cluster and a replicated PostgreSQL cluster built with Patroni. All of them installed on my Linux laptop using Multipass. Cool!
Nomad
Now coming back to our main topic, how you can easily create a Nomad cluster with Multipass. There are already ways of doing this using Vagrant and/or Ansible. But using these custom images I built for Multipass, I think it is simpler now.
The setup we are trying to achieve is this:
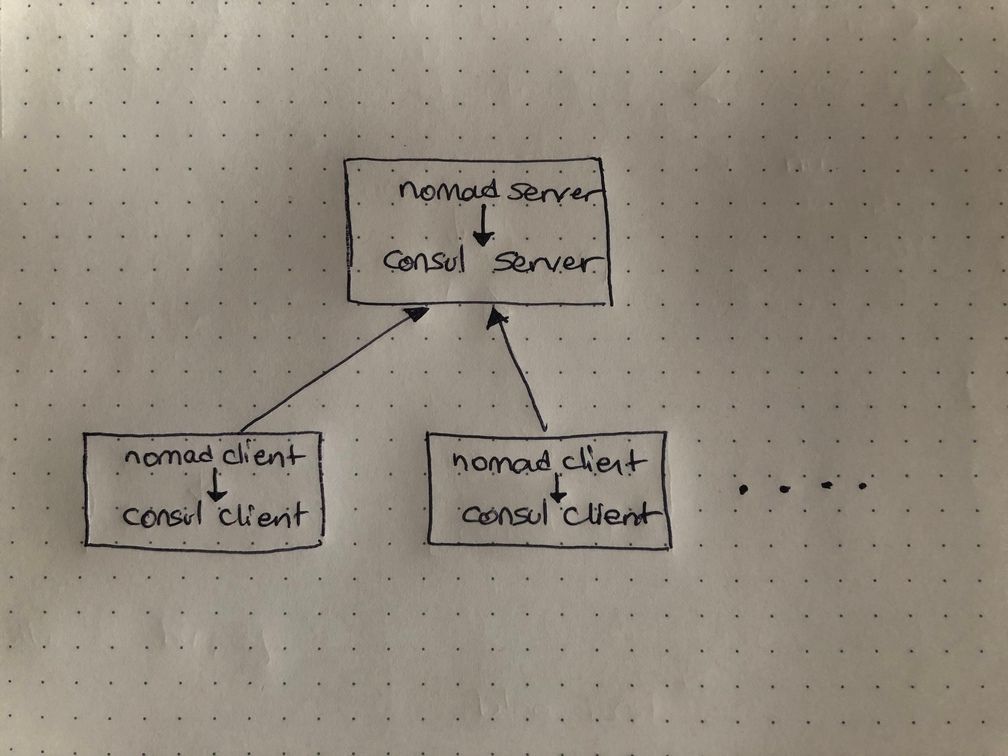
Since this is a test setup, there is no need to run a separate Consul cluster. Both servers can run on a single node. I created two custom Multipass images, one for the server and the other for the clients. The scripts to build the images are on the following github repository:
 GitHub
These are done using another HashiCorp tool, Packer. Building those images are not our concern for this post, so I'm going to use the pre-built images.
Warning: At the time of writing, custom images are supported only for the Linux version of Multipass.
Steps to Launch the Cluster
Run the server.
multipass launch https://img.taypo.com/nomad-server.img --name NomadServerGet the IP address of this VM from multipass info NomadServer.
Consul clients need to know the IP's of the servers. We need to add a simple Consul config line to clients images. Multipass supports cloud-init for customizing images. Create a file cloudinit.yml and put the IP address of the server in it.
write_files:
-   content: |
        retry_join = ["put your nomad server ip between these quotes"]
    path: /etc/consul.d/join.hcl
Now you can launch as many clients as you want.
multipass launch https://img.taypo.com/nomad-client.img --name NomadClient1 --cloud-init cloudinit.yml
multipass launch https://img.taypo.com/nomad-client.img --name NomadClient2 --cloud-init cloudinit.yml
multipass launch https://img.taypo.com/nomad-client.img --name NomadClient3 --cloud-init cloudinit.yml
Consul UI will be running on port 8500 of the server. And Nomad UI on 4646. Here is the whole thing in under five minutes.
Client images come with docker installed, so you can submit docker jobs, such as this, to test your cluster.
VM Sizing
Multipass creates all the VM's with default sizing of 1 GB memory, 1 CPU and 5 GB of disk. All of those can be changed with parameters to multipass launch
bahadir@N45ZA23:~/dev/blog$ multipass help launch

  -c, --cpus <cpus>    Number of CPUs to allocate.
                       Minimum: 1, default: 1.
  -d, --disk <disk>    Disk space to allocate. Positive integers, in bytes, or
                       with K, M, G suffix.
                       Minimum: 512M, default: 5G.
  -m, --mem <mem>      Amount of memory to allocate. Positive integers, in
                       bytes, or with K, M, G suffix.
                       Minimum: 128M, default: 1G.